How do I create a new deposit in BMO DepositEdge?
If you enrolled in the DepositEdge service before March 6, 2026 and you haven't had a service upgrade since that date, please follow this link to find the right steps.
To create a new deposit, you’ll need to complete these steps:
- Capture items
- Correct items (optional)
- Balance deposit
- Review
Please note, if you begin creating a new deposit but don’t complete all the required steps, you can pick up where you left off by retrieving the deposit from the “Open Deposits” section of your DepositEdge home page. How to modify an open deposit
Step 1: Capture items
- In Online Banking for Business, select the Payments & Receivables tab.
- Under “DepositEdge”, select BMO DepositEdge.
- In the “Create Deposit” section, please enter your:
- Location – Where you’re accessing the DepositEdge platform from.
- Account – The account you want the funds deposited into.
- Control Total – The total amount of all cheques in this deposit.
- Location Serial - Only required if you’re using serialization of deposits.
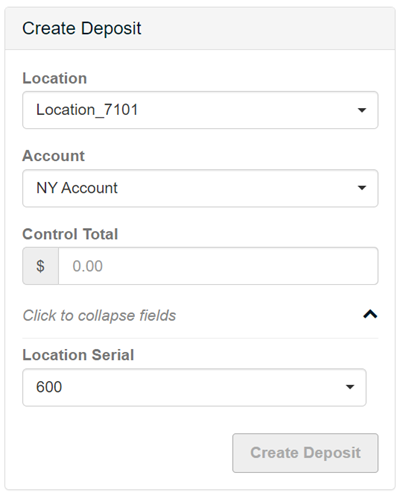
Note: The locations and accounts were added by a system administrator when your profile was created. If you need access to a different location or account, please speak to your Online Banking for Business administrator.
- When you’re ready, select Create Deposit and a new page will open.
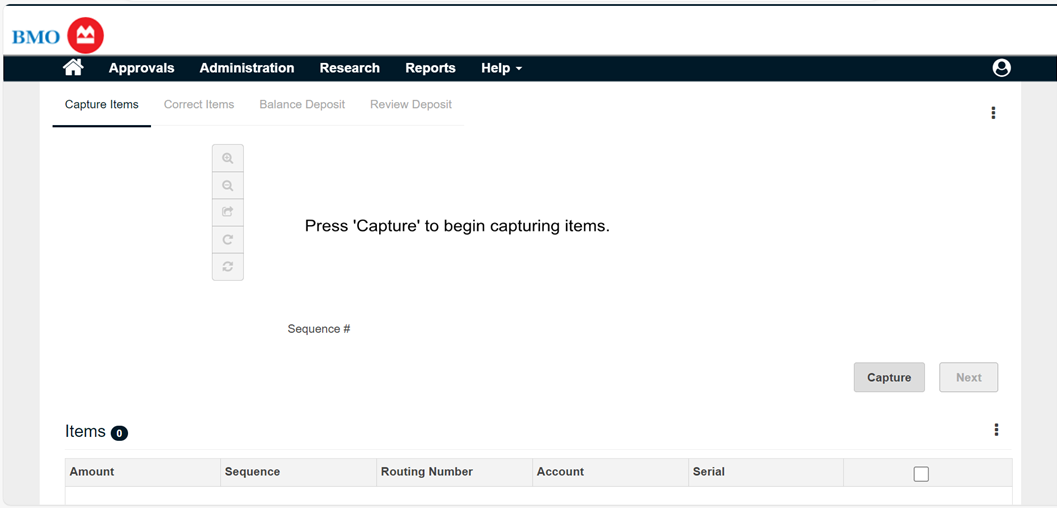
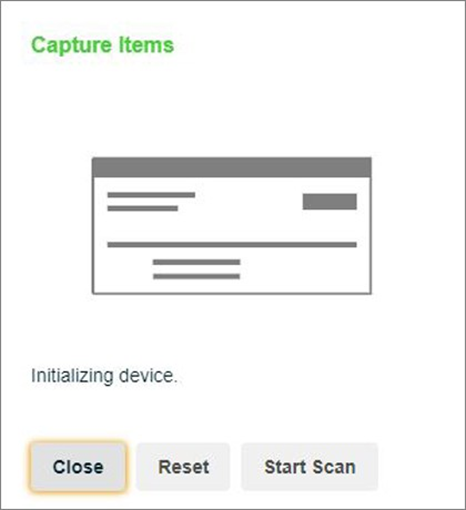
- When the “Capture Items” page appears, load your cheques into the scanner and select Capture.
- A new “Capture Items” window will open. Select Start Scan. The cheques that you’ve loaded are automatically fed through the scanner and added to the deposit. Note: In the event of a jam or double-feed, select Reset.
- When all cheques have been scanned, select Close in the “Capture Items” window.
- The “Capture Items” page will now show the cheques you’ve just scanned in the “Items” list. You’ll also see electronic images of your paper cheques above.
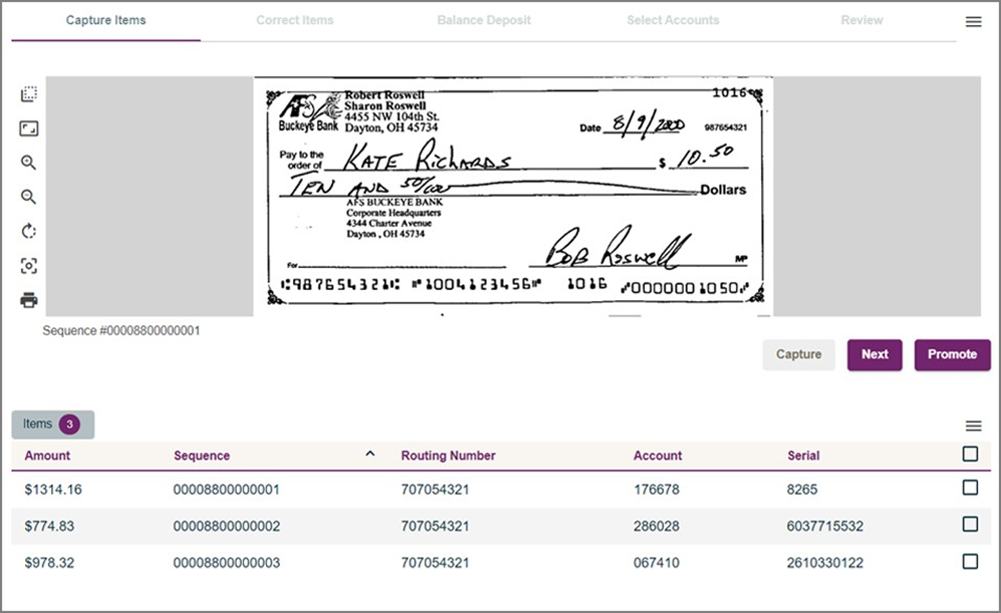
- When you are finished capturing items, complete one of the following actions:
- Select Next to move on to the next part of the process.
- If applicable, select Promote to submit the deposit for final review and completion by another user. In this case, the system will send an email to the other user, letting them know that a deposit requires completion (this is an optional feature).
- Select Submit to complete the capture process.
If any items need to be corrected, continue to Step 2. If not, please continue to Step 3.
Step 2: Correct items
This option will appear if issues are identified with any of your cheques.
- To accept an item and include it in your deposit, select Accept.
- To remove an item from your deposit, select Remove Item.
And depending on how your service has been set up, you may be required to enter additional data about your cheques. Mandatory fields are marked in red:
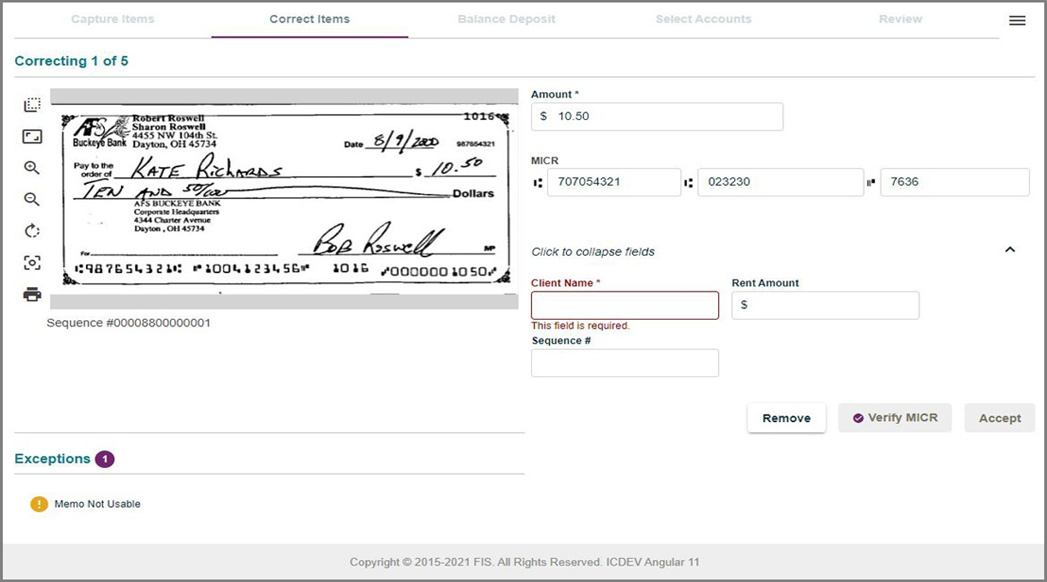
Once the last item has been corrected, you’ll be asked to balance your deposit. For more information, see How to make corrections to my BMO DepositEdge deposit
Step 3: Balance deposit
Before you can complete this deposit, you have to make sure the total amount of the cheques you scanned matches the control total you entered in Step 1.
On the Balance Deposits page:
- Check that the amounts in the “Debit Total” and “Control Total” fields match.
- If needed, update values in the “Amount” column, or the “Control Total” field.
When the difference is zero, select Save to move on to the next step.
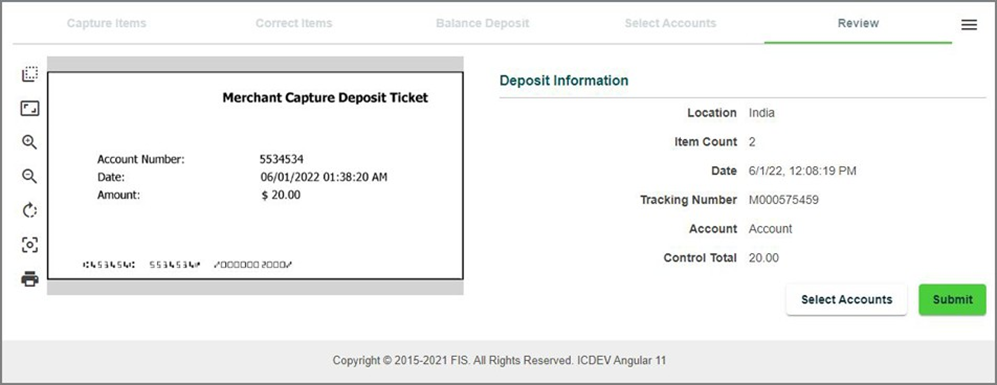
Step 4: Review
This is the last step. If this deposit was previously rejected, you may be asked to provide comments. Otherwise, verify the details of the deposit and select Submit.
You’ve successfully created a new deposit. Depending on your setup. It may still need to be approved by someone else at your company.
Deposits finalized before 7:00 p.m. ET will be credited to your account on the same day. Deposits made after the cut-off time or on non-business days will be posted to your account on the next business day.
Note: Please store your scanned cheques in a secure location for up to 45 calendar days. After 45 days, you can dispose of them safely.
Banking products are subject to approval and are provided in Canada by Bank of Montreal, a CDIC Member.
Top Questions
- f. How do I remove an alert?
- a. How do I generate an RSA SecurID passcode?
- Where can I find the Help Desk number?
- a. How do I download reports using File Transfer Facility (FTF)?
- Need help signing in to Online Banking for Business?
- c. How do I unlock a user?
- How do I install my RSA SecurID soft token?
- e. How do I install my RSA SecurID soft token on Windows?
- b. How do I reset a user's Biometric ID?
- How do I view my account activity?
Top
The screen size of your device is too small to view the page. Please use a larger device.